Wednesday, December 17, 2008

Messy Mama

I see pictures of immaculate sewing rooms. Beautiful, color organized fabric walls... inspirational rooms that would motivate anyone to create. There's even a flickr group to share photos. Drool-worthy. Then there is my sewing room. Until about a month ago we called this the office. Then the desk got taken over by my projects and now it's officially the sewing room- and it's a disaster. Granted, it's the week before Christmas and Hanukkah, so I not only have loads of cape orders but also my own projects for family and friends... but to be honest, if you stopped by in the middle of June it just might look like this. My plan is for a few more shelves above the sewing table. And bins. And I would like to organize my fabric by color. And I should do something with those two bins of scraps that I don't know what do to with but just can't throw away. But for now, here it is. My sewing space. Soule Mama I aint.


Wednesday, November 26, 2008

More capes coming soon!

I will be listing about 15 in-stock capes in the next couple of days. Head over to my Etsy shop to check them out! More will follow. I will have limited custom capes available over the holidays as I focus on spending more time with my family and finishing my own projects! Of course, gift certificates are always available and would make a great gift for kids who want to design their own cape.


Tuesday, November 25, 2008

Creative Handmade Holidays

We are taking the Handmade Pledge again this year. This means that we are making many of our gifts by hand, and are shopping for handmade, preferably local, gifts for the rest of our gifts. You might be thinking, "Lame. There are only so many knit scarves and macrame plant holders a person can take." but I encourage you all to think outside the box! Etsy is an amazing place to shop for creative, unique gifts. Here's what shopping for the holidays looks like for me.

"Hmmm, what are we going to get for Dave? He's really into bicycling. Let me do a search on Etsy and see what I find." I do a general search throughout all of Etsy and it yields 2332 items. I add the word "mens" and it narrows it down to 305 items. I can handle that. I also try it with "bicycle unique" and "bicycle man" to see what that gives me. Then I sort by price. Here are some of the cool things I find that I could get for Dave that are handmade:

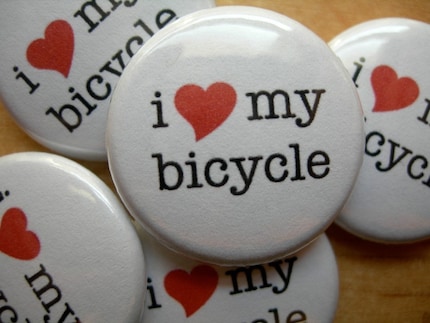
These pins are $1.50 by lolabot. They also have a lot of other bicycle related items.
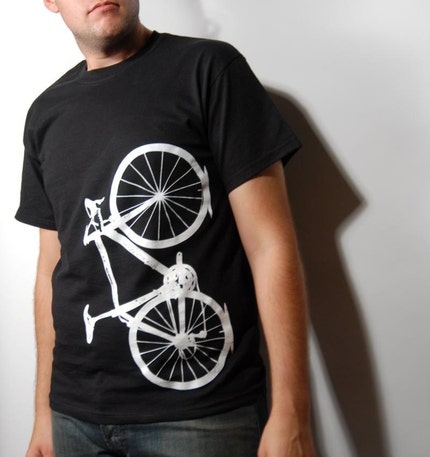

Shirt by Vital, $24


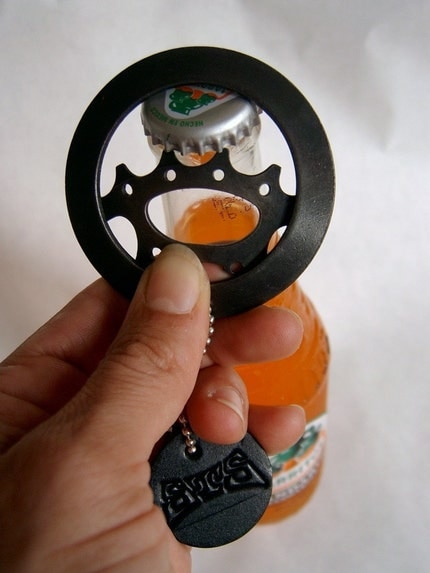
Recycled Bicycle Gear Bottle Opener by Foundry Wear $25


Matted and Framed 8x10 print, "The Bike Mechanic" $75 by Mary Williams Photography


Custom Bicycle Headbadge for $120.


Two Bicycle Pint Glasses by Bread and Badger, $28. They have loads of other cool etched glass pieces, and they are located here in Portland.

So you see- cool stuff! You just have to look for it. In the next few days I'll be posting a few of my favorite unique items from Etsy. Check back in for ideas for kids, teenagers, baseball lovers, and crafters!

Thursday, November 13, 2008

Play Kitchens, Play Food!

Max loves pretending. Just today alone he was a spy, a circus clown, a robot, a pirate, and a dentist. We've been eying play kitchens for awhile, and I've recently been tempted by the retro one at Costco which is on sale for less than $100. Then I thought, why not look on Etsy? Turns out there are some great ones on Etsy! I should've known. Really, what CAN'T you buy on Etsy?!? These are heirlooms that would be nice passed down to grandchildren.

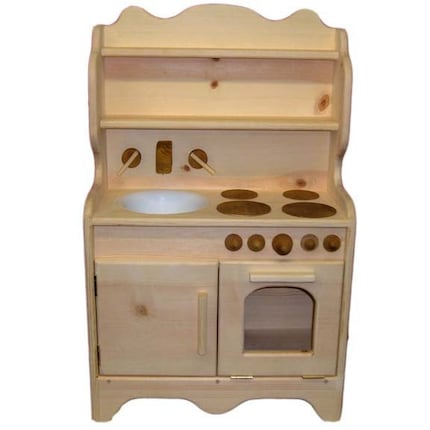
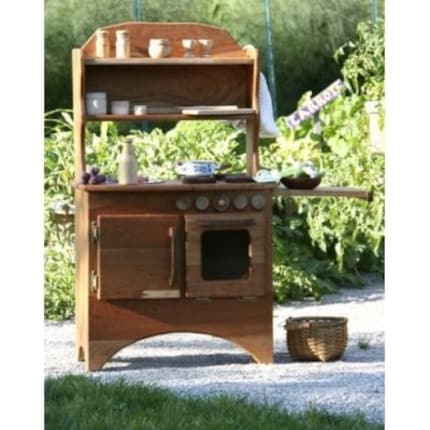
Palumba has a great assortment of handmade toys including this simple play kitchen hearth for $349.99 (that includes shipping). The craftsmanship is gorgous, it even has a cutting board that slides out!

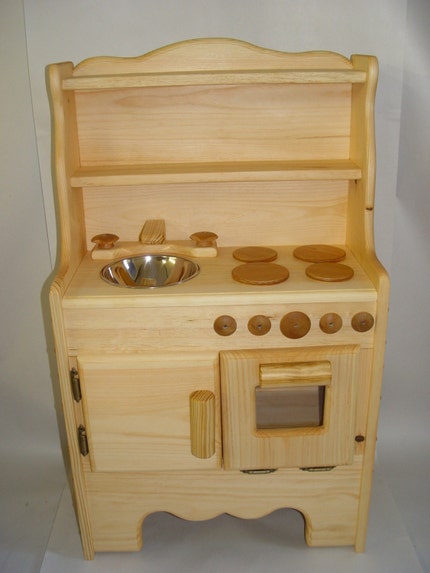
This one is by Willowtoys for $225 (shipping included!)


This one by Imagine that Woodshop is only $143.50 plus shipping.

And now on to play food! There are many types that you can buy, I'm partial to felt or knit playfood myself. And it's so easy to make! Using felt you can hand stitch or use a machine. Here is a site with lots of patterns for inspiration and some patterns, too. I just knit up a little strawberry the other day and it's so cute! Here's a website that links to knitting patterns for everything from a banana to a cinnamon roll. Apparently you can even buy scented batting to stuff your playfood so the piece of cake really smells like cake. Yum.

Here are a few of my favorite items by Etsy sellers for inspiration:

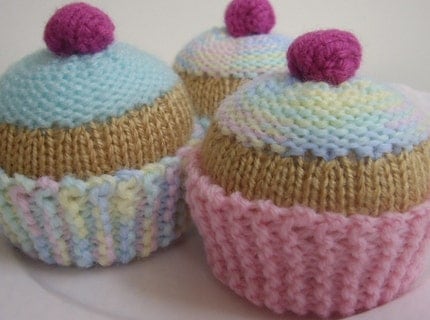
These cupcakes by CrazyDaisy60are adorable! 3 for $24.95, or you can buy the pattern for $5.50

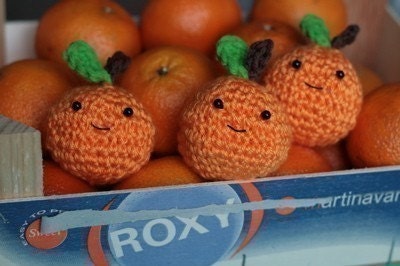
Clementines by Eternal Sunshine, $9

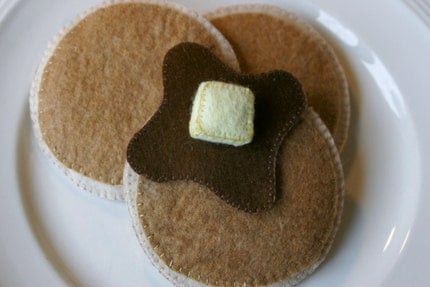
Pancakes by Harvest Moon... yum! $30

Bug Bites Play Food has so many cute items, it's hard to choose one! This Farmers Market produce Basket is $35.
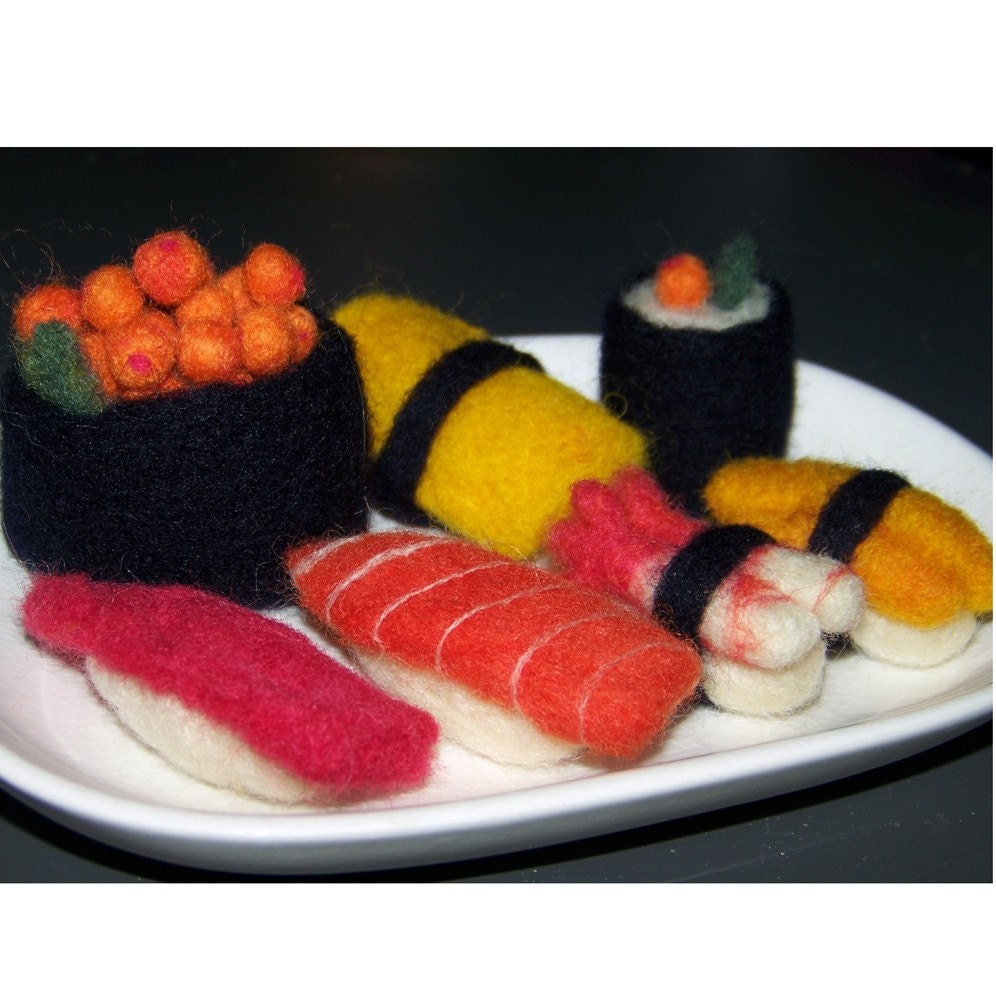
For the discerning appetite- Felted Sushi by Mango Avocado. This is a custom order and not for sale, but she does take custom orders!

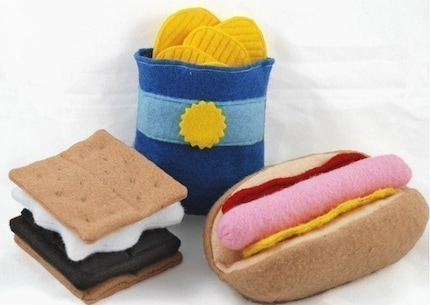
Camping set pattern by BuggaBugs $6


Go forth and play!

Wednesday, September 24, 2008

Crafting Explosion

I like to listen to Podcasts while I sew or drive to work. Crafty ones help motivate me and often introduce me to people and shops that I am unfamiliar with. I love Crafty Pod and Craft Sanity, both of which are an interview format with one hour long show being an interview with (usually) one person involved in arts and crafts. Great interviews, great podcasts. I've recently discovered Craft Mentality - a new podcast of two women chatting about various creative projects they are working on. Everything from knitting and sewing to cooking and Project Runway. They have links on their blog to all the projects that they discuss and MAN, has it got me crafting!

I've started making this bird mobile (click link for pattern). I have no idea who it's for or what I'll do with it, but how could I pass it up?!? It's really easy to make with scraps of fabric. I also went to a local quilting shop where they had small pieces of fabric for $0.50 a piece. I mixed and matched. I've used a sewing machine, but it's simple and easy enough that you can totally hand sew it. And if you just absolutely love it but don't have a crafty bone in your body you can just buy one in Oh My Eye's Etsy shop.

I picked up the knitting needles again after about 9 months of not knitting a thing. I am currently working on a really cute pumpkin hat, some fingerless gloves, and a pair of baby booties. I'm lucky that I have the opportunity to knit at work during my down time!

I also joined Ravelry- an online community for knitters and crocheters. It's a really amazing way to organize your projects. not only that, but you can search for patterns and see other Ravelry members finished versions of them. Nice!

I'm also participating in a craft swap with some local Portland mamas. Just in time for the holidays! Last year we took the Handmade Pledge and had a great shopping for items that were handmade for our friends and family. Of course it was also nice to support other Etsy sellers. Stay tuned for a post of all my favorite handmade holiday ideas!

Tuesday, September 2, 2008

Ditch the Disposables Challenge


One blog that I really like, Crunchy Domestic Goddess, has issued a challenge for September and October- Ditch the Disposables!!! From her blog:

" We live in a society of convenience, where throw-away products are the norm rather than the exception. But all of the disposable products take resources and energy to produce and then, of course, get thrown away, filling up our landfills. All of this is bad news for the environment."

There are many easy ways you can make a change. Below is a list of suggestions, many of which we already do in our home. I've made little notes next to some of them sharing my thoughts.

So what am I swearing to give up? Disposable coffee cups from Starbucks. Seriously, I work right upstairs from one, and often grab a drink on my lunch break. I have a reuseable mug in the office, but I never think to bring it down with me. Same goes with weekends when we stop by Dutch Brothers for an afternoon treat. We all have travel mugs (even Max) but I never bring them with me when I go to a coffee shop. Until now! I mean really- Ron has one of these and they stay hot for something like 5 hours!


Here are some ideas from Domestic Goddess to get you started. You can make the switch from:

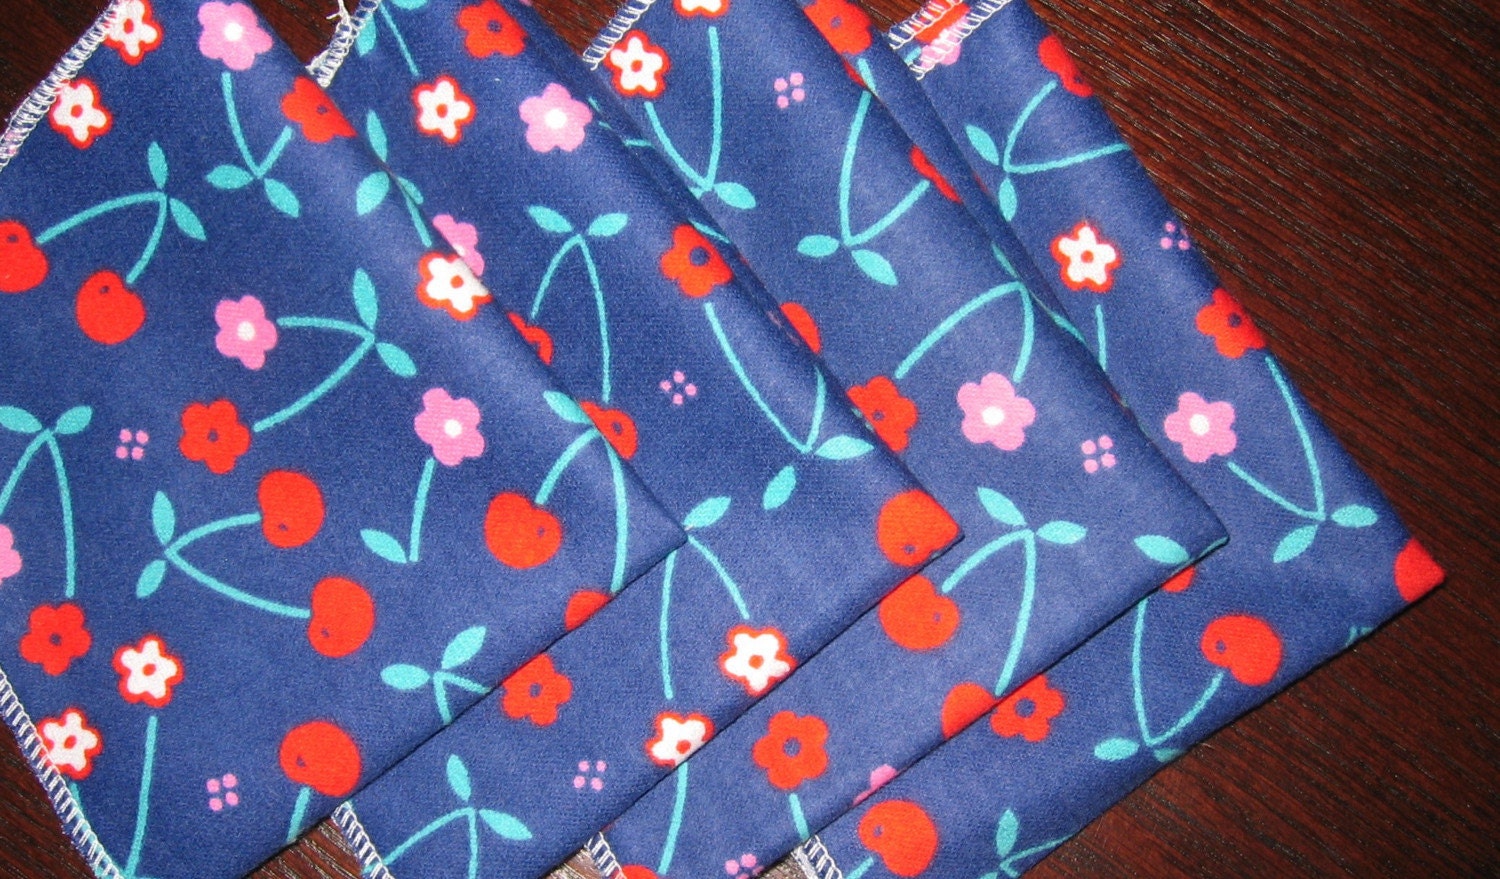
Paper napkins to cloth napkins (There are lots available on Etsy, or at thrift stores. I'm sewing some right now...)


Paper towels to cloth towels (we could be better at this)

Tissues to handkerchiefs (sometimes I grab one of the cloth wipes for Max if he's got a cold, but never think of it for myself. I should make some)

Paper, plastic or Styrofoam plates to your kitchen plates

Inexpensive plastic “Take & Toss” sippy cups to Sigg or Camelbak bottles or the Kleen Kanteen ***We LOVE our Sigg and Kleen Kanteen cups! Max has one of each. I prefer the Kleen Lanteen for him because the spout is easier to use and doesn't leak if it's on it's side. Great way to avoid the BPB's in plastic, anyhow! Especially if I've left water in it for a day or two- no plastic taste with the KK or Sigg bottles. ***
Disposable water bottles to (again) reusable bottles like Sigg or Camelbak **Again, we love these. For adults I like the Sigg better- perect size opening to drink from.

Swiffers (or similar products) to a broom and dustpan or mop (or use reusable cloths like cloth diapers/terry inserts in your Swiffer

Disposable dust rags to cloth rags

Disposable diapers to cloth diapers **I could go on about this forever- we love our cloth diapers! I do admit to having disposables around for travel and for when I get behind on laundry, but the cloth ones are much nicer. We love Fuzzi Bunz, but there are many options out there to choose from.


Disposable wipes to cloth wipes (inexpensive plain washcloths work really well). This is the best part of using cloth diapers, using cloth wipes! It's nice to have an extra thick barrier when you're cleaning poop. I make mine with one layer of soft flannel and one layer of terrycloth, then surge them together.

Disposable feminine products (tampons, pads) to reusables like DivaCup, MoonCup, Glad Rags, Luna Pads, Pretty Pads, or New Moon Pads, among others **I made this change about 6 months ago and wish I'd done it sooner. I love love love the DivaCup. So easy and convenient. And for those of you who have tried those messy "Instead" things- it's nothing like those. And think of the money you'll save- $25 for a Diva Cup that lasts years.

Grocery store bags to reusable bags I'm terrible at this. Oh, I have plenty of reuseable bags, I just forget to bring them with me. Working on it! I think I might get one that scrunches up really small like this and carry it in my bag.

Paper lunch bags for Cloth Lunch Bags, Insulated lunch bags, Bento Boxes, or metal stacking tins. We have the metal stacking tins and LOVE them. And Max loves to take them apart and put them back together again. If you really want to go all out, I've heard these Mr. Bento Box's are awesome. Supposedly they keep your food piping hot (or cold) for hours.


Plastic sandwich bags to Wrap-n-Mat. Again- we seriously love our Wrap-n-mats. I have a few, and the cool thing is that when you open them you have a built in placemat.


Plastic disposable utensils for bamboo or metal ones. These bamboo sets are great. If you eat out a lot, or get takeout on the run,. why not carry a set of these in your bag? Has a napkin and everything.

So there it is. Challenge yourself to make a change for 2 months, then see if you even want to go back! Or simply pick another item from the list in 2 months and take another challenge. Head over to Crunchy Domestic Goddess and tell her what you are ditching- she'll add you to the list of people and blogs who are taking on the challenge.

Monday, August 11, 2008

Muffin Tin Monday- Pretzels!


Today we had a play group at our house. We made homemade pretzels (yum!) and had Muffin Tin Monday as well. We had one tin filled with fruit and veggies and other "dip-able" items, and the other tin filled with dips for the pretzels or fruit. There was marinara sauce, cheese sauce, salt, and cinnamon/sugar. I forgot that I also had ranch dip. Oh well! It was a hit! Pretzel recipe is below with photos of our creations.


Pretzels (slightly modified from the Mall Pretzel recipe on AllRecipes.com)
  • 1 (.25 ounce) package active dry yeast
  • 2 tablespoons brown sugar
  • 1 1/8 teaspoons salt
  • 1 1/2 cups warm water (110 degrees F/45 degrees C)
  • 3 cups all-purpose flour
  • 1 cup whole wheat flour
  • 5 cups warm water
  • 5 tablespoons baking soda
  • 2 tablespoons butter, melted
  • 2 tablespoons coarse kosher salt
In a large mixing bowl, dissolve the yeast, brown sugar and salt in 1 1/2 cups warm water. Stir in flour, and knead dough on a floured surface until smooth and elastic, (or knead in Kitchen Aid with the kneading hook) for about 8 minutes. Place in a bowl greased with butter, and turn to coat the surface. Cover, and let rise for one hour (note- we got sidetracked and let it rise for about 2 hours. They were fine!)

After dough has risen, cut into 12 pieces. Roll each piece into a 3 foot rope about pencil thin. Twist into a pretzel shape and place on parchment covered cookie sheets to rise 15 to 20 minutes.

Combine 5 cups warm water and the baking soda in a saucepan and bring to a boil. Place the pretzels in the boiling water for about 30 seconds, then remove and place back on the parchment (I used a handled strainer like you use to deep fry. A slotted spoon or tongs would work well, too).

Bake at 450 degrees F (230 degrees C) for 8 to 10 minutes, or until golden brown. Brush with melted butter, and sprinkle with coarse salt, garlic salt or cinnamon sugar.

Sunday, August 10, 2008

Win a Custom Panjo Cape!

Amanda over at A Stay-at-home Moms Point of View did a review on my capes. She's also hosting a giveaway to win one of my custom capes. Head on over and check it out! Contest closes on August 22.

Friday, August 8, 2008

Crafty Crow!

Check this out! My Freezer Paper Stencil Tutorial was featured on Crafty Crow.


Very cool! Crafty Crow is a craft collective for kids. They collect really great crafty ideas from various blogs and compile them in one place. Like a one stop shop for all you kid-crafting needs.

And, their ideas are fun and unique, and often things your kids can do with you. Like make Gak:
Adorable Felt Clips:

And a cool cardboard kitchen:

So much inspiration, so little time!

Monday, July 28, 2008

Muffin Tin Monday

I have been so excited to start Muffin Tin Monday. It's a brilliant idea by one of my cyber-friends, Katy. I met Katy when we did a swap on Etsy- she got a cape for her son, and I got a couple of awesome shirts that she made. Since then she has closed her Etsy shop, but she now has time to make this wonderful blog- Sycamore Stirrings. She has some very inspiring ideas, one of which is Muffin Tin Monday. What a great way to remind myself to think out of the box (and into the tin...) and also to sneak in some new things for Max to try in a fun way. I even went out and bought a super cool heart shaped muffin tin. Then when I got it all put together then I couldn't find my camera! I had to use my cell phone and the color is terrible- it looks pretty unappetizing. But really it's good, promise! And Max loved it.

carrots, grapes, peanut butter and jelly sandwiches, hot dogs, and a blueberry banana muffin

I'm going to try to do this every week. Posting it on my blog(s) will hopefully keep me thinking of more creative things to put in the tins each week.

Friday, June 20, 2008

Freezer Paper Stencils

Yup, I've jumped on the bandwagon and am officially hooked on Freezer Paper Stenciling. I first saw it over on The Artful Parent, she is so hooked that she opened an Etsy shop to sell all her cute designs. I started looking around at other artsy blogs and saw how easy it looked so I finally picked up some freezer paper, an exacto knife, some of Max's plain t-shirts, and fabric paint. Here are the results:

Not bad for our first time! It's super easy, try it with your superkid, you'll both be hooked! Here's how:

Buy freezer paper. You should be able to find it at your grocery store near the tin foil and cling wrap. You cannot substitute wax paper!

Draw your own design on the paper side of the freezer paper, or cut the freezer paper into 8 1/2 x 11 pieces and print some simple designs off your computer right on to the freezer paper. I just searched through a bunch of clip art and found some cute designs. **Edited to add: This works well on a home inkjet printer. Someone I know MAY have tried it on big printer at work only to have it get to hot and cause the freezer paper to stick to the rollers inside the printer causing a jam- not to mention the panic of trying to get it out before you have to tell the boss that you were trying to print a freezer paper stencil from the work printer. So, run freezer paper through the printer at your own risk. ** If you don't want to run it through your printer, simply print the stencil on a regular piece of paper and tape it on top of the freezer paper then cut it out.


Next use an exacto knife and carefully cut out all the pieces. You can use both the inner and outer pieces to make a regular and a reverse image, so cut carefully! I got this small cutting mat to bring to work. During my down time I cut out several stencils so they were ready to go the next morning.
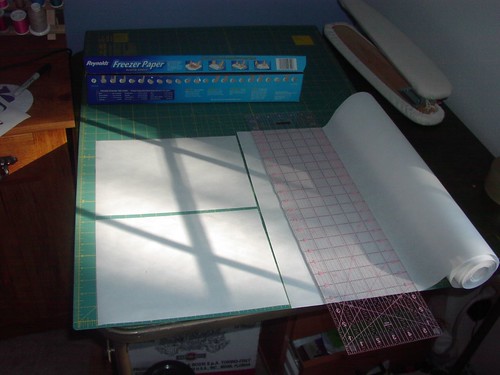
Make sure you have a bowl nearby to put all the teeny tiny "island" bits in. You don't want to loose them! When I cut all my stencils out I put all the bits in one glass and they got all mixed up. Next time when I'm done cutting one stencil i will put all those pieces together in an envelope. One that isn't white, so I will be able to see the pieces easily. It's also a good idea to label the small pieces if you think you might get them mixed up.
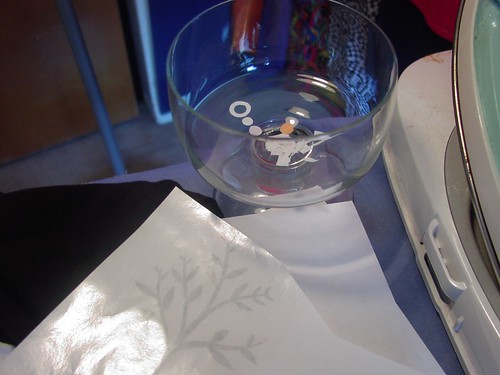
Then simply place the stencil waxy side down on your shirt, and iron on medium heat for a few seconds until it sticks. I ironed on the big piece first, then placed all the inside "island" pieces and ironed them down next.
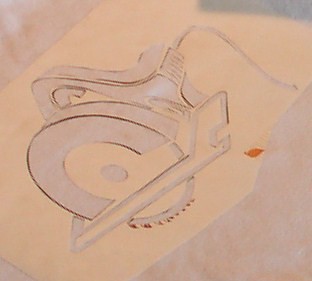
Using fabric paint (although i've heard Acrylic paint works great, too...) paint on your stencil! I couldn't find a paint brush and just couldn't wait so I used an old cosmetic brush. :-) I learned to be a little more careful around the edges, this saw came out a little rough around the edges. I think either I ironed it on too much and it didn't stick well, or I didn't iron enough, or I just gooped the paint on too much. I got a much more crisp line with the later ones where I brushed inward from the paper onto the fabric, instead of on the fabric towards the paper... if that makes sense.
Then peel off your paper and voila!
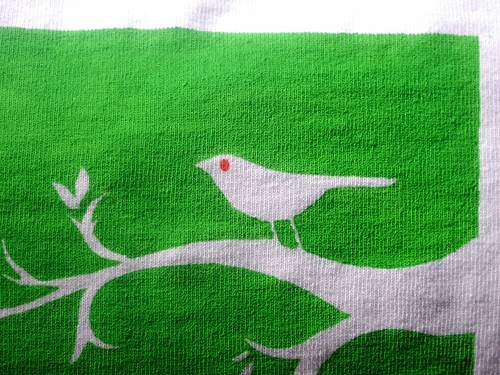
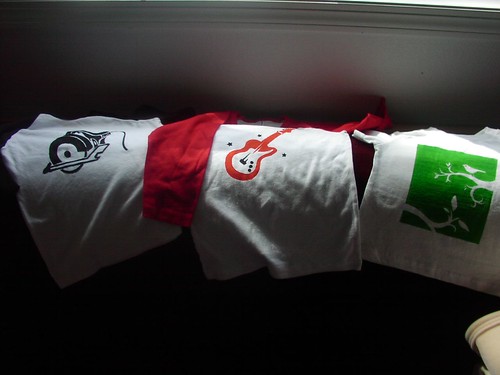
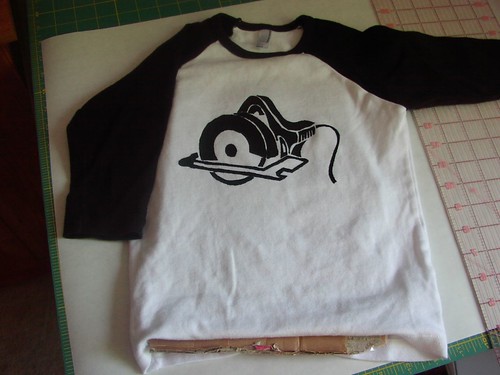
I read that you don't have to wait until it dries, although I think that for getting off some of the small pieces it would be easier to wait until it dries. I couldn't wait long enough on the guitar and the tree with the bird, and they turned out great!

I love the crisp edges. I have several more stencils to try, plus the reverse images... now to hit garage sales this weekend and pick up more shirts! Or aprons... or hats... the possibilities are endless!

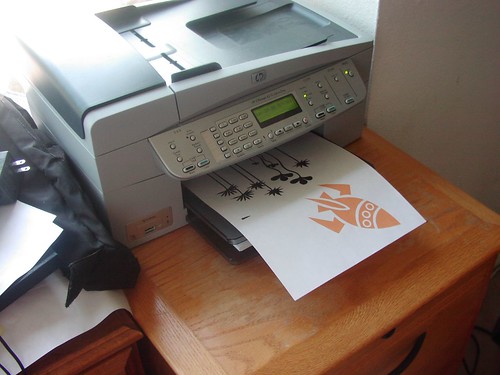
And, if you are wondering what to do with the big 'ol roll of freezer paper (other than more stenciling, of course!) you can also use it to run fabric through your printer. Check out one of my favorite blogs, Sycamore Stirrings- she prints her kids art onto fabric, then makes pot holders!